Manicure Magic: Beginner’S Guide To Nail Art Techniques & Tools
Nail art has been around for centuries, with the earliest forms seen in ancient Egyptian, Chinese, and Incan civilizations where nails were painted with bright colors. However, modern nail art really emerged in the 1930s when automobile paint was applied to nails. The trend continued gaining popularity through the 1980s and 1990s.
In recent years, nail art has seen a huge surge in popularity, partly fueled by social media. Intricate nail art designs are being shared widely online across platforms like Instagram, Facebook, and Pinterest. The Covid-19 pandemic also contributed to the rising popularity of nail art as people spent more time doing creative activities at home.
Nail art provides an exciting creative outlet for self-expression and experimentation. It allows you to transform your nails into mini canvases. The designs and color combinations are endless. Nail art is a great way to try new trends and display your own personal flair.
Some benefits of nail art include boosting self-confidence, developing artistic skills, relieving stress, and bonding with others. Overall, nail art is a fun way to accessorize your look while channeling your creativity.
Basic Nail Art Techniques
There are several fundamental nail art techniques that every beginner should learn. Mastering these basics will allow you to create more advanced and intricate nail art designs.
Dotting
Dotting is one of the simplest nail art techniques (https://www.masonanthony.com/mastering-nail-art-from-basics-to-advanced-techniques/). Using a dotting tool, apply dots of nail polish onto the base coat. You can create different patterns and designs like polka dots, flowers, and abstract shapes. Start with a single color, then experiment with combining two or more colors.
Sponging
Sponging involves dabbing on nail polish with a makeup sponge. Apply a base color first, then dab on accent colors using a sponging technique. This allows you to create an ombre or gradient effect. Make sure to use a pouncing motion rather than swiping to avoid removing the polish underneath.
Ombre
To create an ombre look, apply your base coat then choose two nail polish colors that complement each other. Paint the lighter color starting at the base of the nail and gradually blend it into the darker shade as you brush upwards. The colors should transition seamlessly from light to dark.
Gradients
Gradients produce a color transition like ombre, but in a linear direction rather than blended. Paint on your base color, then use makeup sponges to dab on the second color starting at the top or bottom and working upwards or downwards. This will create a clear delineation between the two shades.
Striping Tape
Striping tape allows you to create straight, geometric patterns and sharp lines on your nails. Apply a base color first, then place the striping tape on your nails in vertical, horizontal or diagonal lines. Paint over the tape with a contrasting color. Finally, remove the tape to reveal crisp stripes.
Stamping
Nail stamping transfers intricate designs using a stamping plate and scraper. After applying your base coat, choose a design from the plate and scrape the image onto the stamper tool. Then press the stamper onto your nail to transfer the design (https://www.youtube.com/channel/UCm0mhBVAN7BBU94ZHY_IHQw). Repeat for each nail.
Nail Art Tools and Materials
Having the right tools and materials is essential for creating beautiful nail art designs. Here are some of the key supplies you’ll need:
Dotting Tools
Dotting tools allow you to create delicate dotted designs. They come in different sizes of metal or plastic heads on wooden or metal handles. Use different sized dotters for larger or smaller dots.
Striping Tape
Striping tape lets you create straight lines and geometric patterns. Apply it to the nail before painting over it. Peel it off to reveal perfect stripes.
Rhinestones and Sequins
Adding rhinestones and sequins creates show-stopping sparkle. Use nail glue to affix them. Go for small stones for subtle accents or large stones for major bling.
Foil
Foil nail art supplies come in sheets of metallic colors like gold, rose gold, silver, etc. Brush on a special adhesive polish, apply foil pieces, and seal with top coat for instant glam.
Nail Polish
Build up your collection of nail polishes in various colors and finishes. You’ll need base coats, solid colors, glitters, shimmers, and top coats. Quality polishes allow for smooth application.
Brushes
Nail art brushes let you paint on fine details and designs. Pointed brushes are great for outlines and stripes. Fan brushes can create strokes for gradients. Look for variety in brush shapes and sizes.
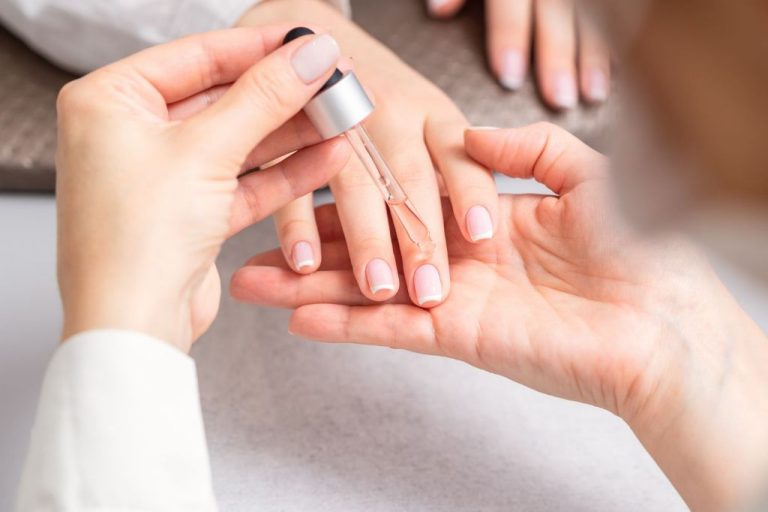
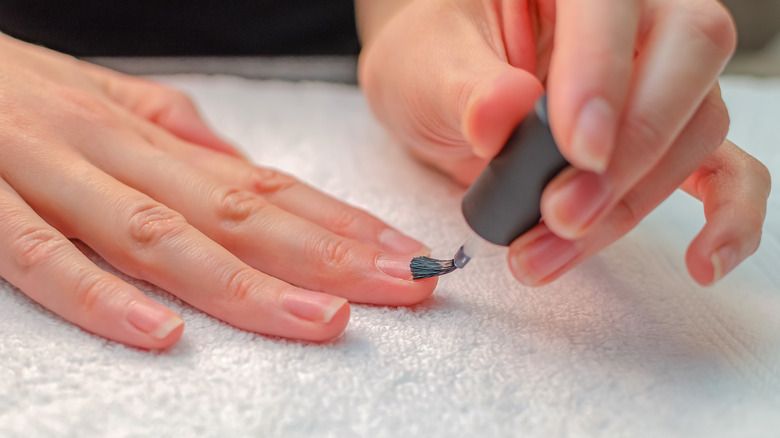
Nail Prep and Base Coats
Proper nail prep is crucial for achieving a flawless and long-lasting manicure. Before painting your nails, it’s important to start with some nail care basics.
First, trim and file your nails into the desired shape. Use a nail file to gently buff away any rough edges or peeling layers on the nail plate. Filing your nails will create a smooth surface for polish application.
Next, soften and push back your cuticles. Apply cuticle remover or oil and use a cuticle pusher to gently push back overgrown cuticles, which can cause chipping and lifting. Never cut your cuticles, as this can damage the nail matrix.
Then, wipe nails with a nail dehydrator or alcohol to remove oil and prep the nail. This will help the base coat and polish adhere properly.
Apply a nourishing base coat focused on hydration and protection. As per BeautyStyleTip, effective hydrating base coats are crucial for longevity of your manicure. They help prevent staining, peeling, and premature chipping and cracking. Let the base coat fully dry before moving onto polish.
With proper nail prep and a good base coat, you’ll be ready to apply your nail art with a smooth canvas that will really let the designs pop!
Dotted Nail Art Designs
Dotted nail art, also known as polka dot nails, is a fun and easy nail art technique that can be customized in endless ways. From simple polka dots to intricate animal prints, dots allow for creative expression on your nails.
Polka dots are a classic dotted nail design. Start with a base color, then use a dotting tool dipped in a contrasting polish to create various sized dots on each nail. Play with different color combinations like black and white, pink and blue, or go bold with neon polka dots.
Animal prints like leopard, cheetah, zebra, and giraffe can be created using different sized dots. First map out where you want the spots to go with a dotting tool, then fill them in and use a striping brush to define the pattern. An abstract animal print allows more creativity in placement and colors.
Abstract art using dots lets you get creative. Make waves, stripes, geometric patterns, and more using dots, lines, and angles. Gradient dots ombré from the cuticle to the tip are also eye-catching. The options are endless with abstract dot art!
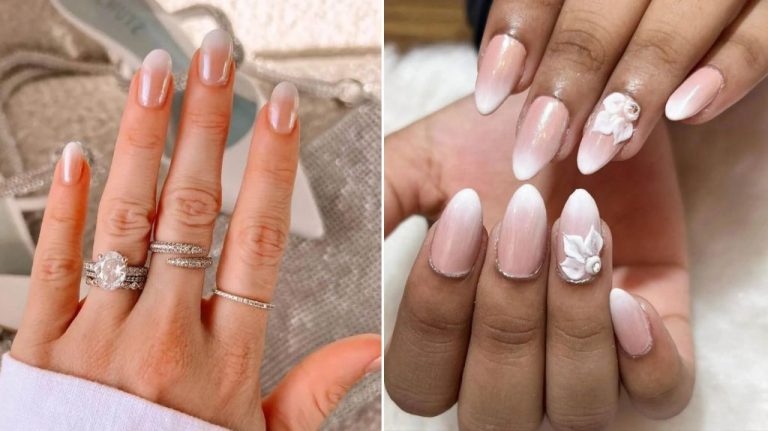
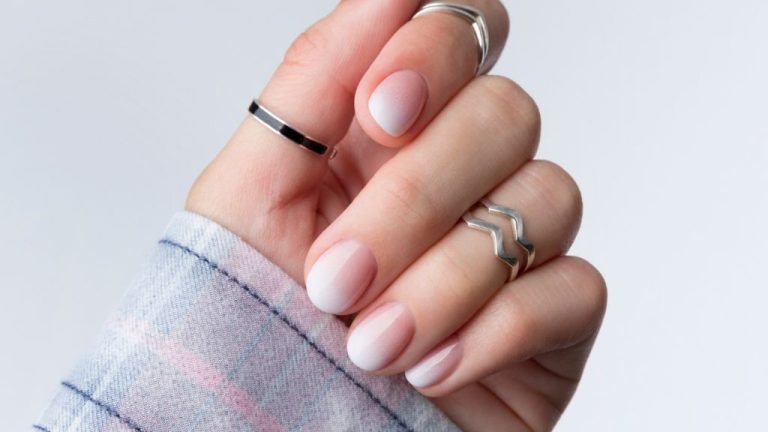
Gradient Nail Art
Gradient nails, also known as ombre nails or color fade nails, are a trending nail art technique. Gradient nails involve blending two or more nail polish colors to create a stunning fade effect.
Ombre gradient nails typically transition between lighter and darker shades of the same color family, like pink to red. But you can also create unique color combinations like teal to seafoam green. When doing gradient nails, choose nail polish colors that complement each other and blend smoothly.
There are a few techniques for achieving the perfect ombre gradient effect:
- Sponge method – Apply colors to a makeup sponge and dab onto nails
- Brush strokes – Carefully paint on colors using upward brush strokes
- Back and forth – Alternate painting colors back and forth in thin layers
Experiment with horizontal, vertical, diagonal or curved gradient designs. Get creative with gradients on accent nails or negative space nails too. The blending possibilities are endless!
For pro tips on mastering gradient nail art, check out this helpful video tutorial: https://www.pinterest.com/nailgasmtv/gradient-nail-art/
Striping Tape Nail Art
Striping tape is a fun and easy way to create graphic nail art designs. The tape comes in different widths and colors, and can be placed diagonally, vertically, horizontally or in chevron patterns to make straight, geometric designs. It’s great for beginners because there’s no need to have a steady hand to paint perfect straight lines.
To create chevron striping tape designs, apply the tape from side to side in a zig-zag pattern across the nail. Use two alternating colors for a bold, eye-catching look. For diagonal striped designs, apply tape across the nail at an angle. Try using metallic tapes like gold, rose gold or silver for stylish stripes. For French tip designs, apply striping tape around the tips of the nails, keeping it straight for a clean line.
An easy design for beginners is to place striping tape diagonally across the nail, dividing it into triangular sections. Fill in each section with a different color polish to create geometric, mosaic designs. The key is to use the negative space in between the striping tape creatively. For example, you can paint the sections one color, and the negative space a contrasting color for maximum impact.
Some top tips when working with striping tape: Apply over completely dry polish, press the striping tape down firmly and go slowly when removing to reveal crisp lines. Using a top coat over your striping tape designs will help them stay put! Striping tape allows anyone to create professional looking nail art at home.
Source: https://www.pinterest.com/salinarush/striping-tape-nail-art/
Stamping Nail Art
Stamping nail art has become a hugely popular technique for creating professional nail designs at home. It involves using etched stamping plates, a scraper, and a stamper to transfer intricate nail art patterns onto your nails with polish. The process is easier than freehand nail art and allows you to get consistent, crisp designs every time.
Stamping plates are thin metal plates that have various nail art images etched into them, usually in a range of sizes and designs. Some popular options include floral patterns, mandalas, geometric shapes, animal prints and more. Leading brands for high quality stamping plates include MoYou London, UberChic Beauty and bundle sets on Amazon.
To transfer the etched design, you’ll need a metal scraper to swipe an accent nail polish over the plate and pick up the design. Then use the stamper tool to press down on the polish left on the plate and transfer the image onto your nail. The beauty is that you can reuse plates again and again to stamp different designs! Focus on single stroke, simple images when starting out.
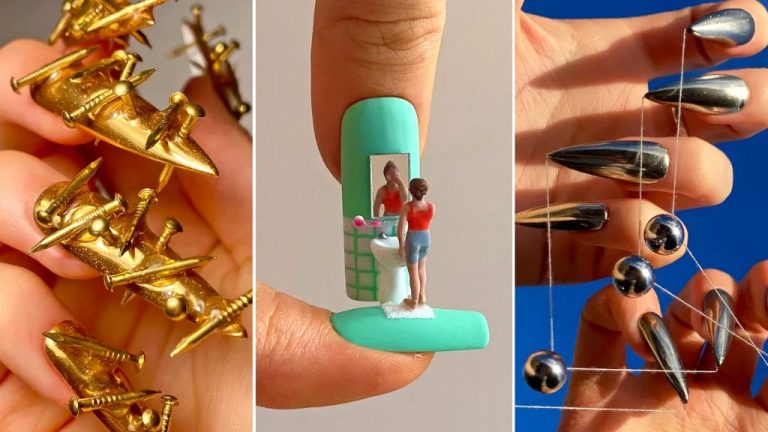
3D Nail Art
3D nail art takes designs to the next level with dimensional elements that pop off the nail. Popular 3D embellishments include:
- Rhinestones – These sparkling gems come in various shapes and sizes to add eye-catching bling to any manicure. According to Amazon.com, rhinestones are a top seller for creating 3D nail art designs.1
- Charms – Tiny charms like bows, flowers, and mini motifs give a playful and cute touch. Charms can be purchased in bulk and applied with nail glue or acrylic.2
- Studs – These decorative dots come in different shapes like hearts, stars, and circles. Studs add subtle texture and interest.
- Flakes – Iridescent flakes or foil flakes deliver eye-catching shimmer. They easily adhere to polished nails with top coat.
The key with any 3D embellishment is making sure it is properly secured to avoid losing any charms or gems. Using a quality nail glue is important. Top coat also helps seal on any 3D elements. With the right supplies and technique, you can create stunning nail art with added dimension.
Caring for Nail Art
One of the key aspects of caring for nail art designs is using a good top coat. A top coat is essential for sealing in your design and preventing chipping or smudging. According to nail enthusiasts on Reddit, it’s important to “Apply top coat before using nail vinyls,” as the top coat creates a smooth surface for the vinyls to adhere to.
When applying your top coat, use thin and even strokes to cover the entire nail and avoid smearing the design. Let the top coat dry completely before doing any activities with your hands. Popular top coat choices include Seche Vite Dry Fast Top Coat and Essie Good To Go Top Coat.
To make your nail art last even longer, avoid using your nails as tools and be gentle with your hands. Also, use cuticle oil daily to moisturize the nails and surrounding skin. When it’s finally time to remove your design, use 100% acetone remover and cotton balls. Let the acetone soak for a few minutes before gently rubbing off the polish. As recommended by nail YouTuber Kelli Marissa, keep acetone and a clean up brush on hand in case you make any mistakes.