Nail The Gradient: Mastering Ombre Hues For Spring Nails
Ombre nails, sometimes referred to as “baby boomer” nails, is a popular nail art technique that involves blending two or more nail polish colors to create a gradient effect. The look has been trending in recent years, with the blending of colors creating a unique, eye-catching manicure.
The term “ombre” comes from the French word meaning “shaded.” When applied to nails, it refers to nails that transition from dark to light colors, or vice versa. While ombre hair was the initial inspiration, the technique has become widely adopted for nails as well.
Ombre allows for creativity and self-expression through nail art. With proper technique, stunning nails that fade from one hue to the next can be achieved. From subtle and elegant to bold and dramatic, ombre nails offer lots of possibilities.
Choosing Your Base Colors
When it comes to creating an ombre manicure for spring, choosing the right base colors is key. Popular nail polish colors for spring include pastels, brights, and nature-inspired hues like green, blue, pink, yellow, and purple. According to 9 Spring Nail Color Trends for 2021, the top colors for spring 2021 nails are sunny yellows, lavender purples, minty greens, neutral nudes, bright oranges, pale pinks, rich chocolates, and earthy terra cottas.
For a springtime ombre look, select two complementary base colors that transition seamlessly. Soft pastel hues like blush pink, lilac, and seafoam green create a delicate ombre perfect for spring. Bolder bright shades like tangerine, emerald, and cobalt blue make a fun statement. Don’t be afraid to get creative and mix up polish textures as well – try pairing a creme with a shimmer or glitter for added depth.
Focus on choosing base colors that you love and that reflect the bright, joyful spirit of spring. The ombre effect will seamlessly blend them for a gorgeous manicure that transitions gracefully from day to night.
Creating the Gradient
Creating a seamless ombre gradient is key to achieving the perfect ombre nail look. There are a few techniques you can use:
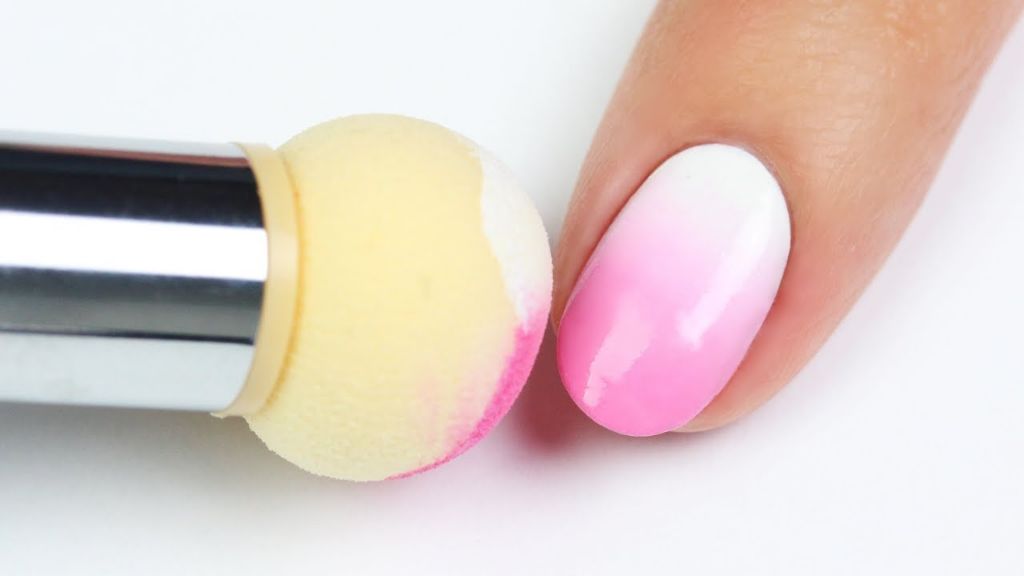
The most common method is using a makeup sponge. Apply your lightest color to the tip of the nail. Next, paint your darkest color near the cuticle. Then, use the thin edge of a makeup sponge to gently blend the two colors together in the middle of the nail, smoothing the gradient by patting lightly (source). The sponge technique creates a soft, blended effect.
You can also create an ombre gradient using a brush. Apply your lightest shade to the nail tip.Then use a clean brush with your darker shade to paint downwards from the cuticle, overlapping the lighter color and gently blending together. Continue brushing downwards, wiping excess on a paper towel as needed, to create a gradient (source). The brush technique gives you more control but can take some practice to master.
No matter which technique you choose, work slowly and gently to achieve a seamless fade between the two shades. Let the polish dry between coats as needed. Blotting excess polish as you work helps create a flawless ombre effect.
Adding Accents
Nail art accents are a great way to make your ombre manicure pop. Here are some fun ideas for accent nails that complement the ombre look:
-
Glitter or shimmer – A coat of glitter or shimmery polish on one or two nails adds just the right amount of sparkle. Keep the glitter sheer or opt for chunky, colorful pieces.
-
Metallic details – Metallic nails, gold leaf, or chrome powder are chic accents against soft ombre shades.
-
Stamping – Stamped images or patterns in metallic polish give an eye-catching effect. Geometric shapes work nicely.
-
Rhinestones – Tiny crystals or rhinestones applied near the cuticle give a jeweled touch. Keep it minimal for just a hint of extra bling.
-
Stripes or polka dots – Thin striped tape or hand-painted dots overlaying the ombre look nicely.
-
Matte top coat – Switching just one or two nails to a matte finish adds visual interest.
The options are endless for accent nails that complement soft ombre shades! Let your creativity shine through.
Top Coat Considerations
The top coat is a crucial step for finishing off ombre nails and sealing in the design. There are a few options to consider:
Matte top coat: A matte top coat will give ombre nails a smooth, velvety finish. This helps tone down the shine and gives a more subtle look. Matte top coats also prevent chipping and peeling.1
Glossy top coat: A high shine top coat will make the ombre colors pop and appear more vivid. Glossy top coats accentuate the gradient effect. They also protect the manicure and create a smooth surface.2
Quick dry top coat: Using a quick dry top coat will help set the ombre nails fast. This prevents smudging or blurring of the gradient while the polish is still drying.
Water-resistant top coat: A top coat formulated to be water-resistant will help ombre nails last longer without chips or peeling. This provides a protective barrier against water damage.
Apply the top coat carefully with even strokes from base to tip to preserve the ombre effect. Let each coat dry fully before applying the next. Use thin layers of top coat to avoid dulling down the colors. With the right top coat finish, ombre nails can look flawless and last over a week.
Caring For Ombre Nails
Maintaining your ombre acrylic nails requires some extra care and attention compared to solid color acrylics. The gradient effect can start looking muddy if the nails grow out too much or if the colors fade unevenly. Aim to get fill-ins every 2-3 weeks to keep the tips looking crisp.
When washing dishes or cleaning, be sure to wear rubber gloves to protect the nails from chipping and excessive water exposure (https://www.reddit.com/r/Nails/comments/10c3hdq/how_do_i_take_care_of_my_acrylic_nails/). Avoid picking at your nails as this can cause lifting near the cuticles. Use cuticle oil daily to keep the nail bed hydrated.
To refresh the color between appointments, you can use an at-home gel polish system to apply a sheer layer over the ombre tips. This will help brighten up any faded spots and keep the gradient looking seamless.
Common Mistakes
Ombre nails may look effortless, but they do require some technique. Avoid these common mistakes when attempting ombre nails at home:
Too Much Color Contrast: Choosing two colors that are wildly different, like black and neon yellow, can look harsh instead of blended. Opt for hues that are closer together on the color wheel for a more cohesive look.
Insufficient Blending: Not taking the time to properly blend the two colors results in an obvious demarcation between them. Make sure to thoroughly mix the colors where they meet.
Too Thick Of A Gradient: Don’t make the gradient too wide by painting too much of one color up the nail. Keep it to just 1/4 to 1/3 of the nail length.
Messy Application: Use painter’s tape to create straight lines and prevent the colors from bleeding into each other.
Choosing The Wrong Colors: Make sure both colors suit your skin tone. Warm tones pair best with warm colors and cool with cool.
Skipping Base And Top Coats: Don’t forget to apply base and top coats to help the polish adhere and add shine.
Removing Ombre Nails
Removing ombre gel nails safely is important to avoid damage to the natural nail. Start by filing off the topcoat with a coarse nail file, being careful not to file into the natural nail. This removes the shine and smooths the surface for acetone to penetrate the gel polish. Next, dampen a cotton ball or pad with pure acetone nail polish remover. Press it firmly onto each nail and hold for 10-15 minutes, adding more remover as needed. The gel polish should start to lift at the free edge. Gently push it back with an orangewood stick. Repeat until all traces of color are gone. Buff briefly to remove residue. Follow with a hydrating cuticle oil. This gradual process helps avoid nail plate damage that can occur from soaking off gels (source).
Ombre Nail Inspiration
When it comes to ombre nails, the possibilities are endless. From subtle fades to bold color transitions, ombre nails allow you to get creative and make a statement. For inspiration on ombre nail ideas, check out these stunning examples:
This glitter ombre fade combines shimmery pink and nude polishes for an eye-catching look. The glitter polish starts opaque at the cuticle and fades gradually, leaving just a hint of sparkle on the nail tips (https://www.lemon8-app.com/discover/unique%20ombr%C3%A9%20nail%20looks).
Purple and black polishes create a bold ombre statement on these acrylic nails. The deep purple hue starts opaque and fades into a sheer black, mimicking the night sky. This dark ombre look is perfect for creating drama (https://www.lemon8-app.com/discover/ombre%20nail%20ideas%20for%20playful%20looks?region=gb).
For a playful pastel look, try an ombre fade with light pink, lavender and baby blue. The soft, graduated tones are sweet and feminine. Paint various widths of color on each nail for a unique look.
Give basic nude nails a makeover with a metallic ombre fade. Start with a rich rose gold or copper at the cuticle that transitions into a sheer nude. The metallic sheen makes this subtle ombre eye-catching.
Get inspired by nature with an ocean-inspired teal and seafoam green ombre. These cool tones are tranquil and sophisticated. Try accenting with tiny seashell charms or rhinestones.
Let me know if you would like me to modify or expand this section further.
Conclusion
Ombre nails are a gorgeous, artistic way to experiment with nail colors and gradients this spring. By starting with a proper base, carefully blending your polish, and applying a quality top coat, you can achieve stunning ombre nail looks that transition smoothly from light to dark or one color to the next. Be patient as you master the technique—it takes some practice to get the gradient just right. But the end result is well worth the effort. To recap, choose your base shades wisely, blend with light, consistent strokes, add creative accents if desired, and protect your manicure with regular top coats. With a little time and practice, you’ll be nailing perfect ombre nails in your own home!
A few final tips: don’t forget to cap the free edge to prevent chipping, watch polish consistency as you work to avoid blotchiness, and take your time removing ombre nails to avoid damage. Have fun with your ombre nail art this season! The possibilities are endless.