Easy Diy Nail Art Using Household Items
DIY nail art using common household items has exploded in popularity in recent years. According to market research firm Kline, the at-home nail polish category grew 3.3% in 2021 on top of a 21% surge in 2020 (source). The COVID-19 pandemic led to the closure of many nail salons, causing more people to experiment with nail art at home. Social media platforms like Instagram and TikTok have also fueled interest in unique, customized nail looks that can be achieved on a budget using simple household items.
The appeal of DIY nail art is the creativity it allows without spending a lot of money. Rather than using specialized tools and polish, homemade nail art relies on easy-to-find items like toothpicks, tape, bobby pins, and more. This opens up endless options for creating one-of-a-kind manicures. Doing nail art yourself also allows for self-expression and tailoring designs to your personal taste.
Benefits of Using Household Items
Using common household items for nail art provides many advantages when compared to store-bought nail art supplies according to https://www.eighteenvisions.com/blogs/news/the-benefits-of-home-manicures. First and foremost, household items are extremely cost effective. You likely already have many of the supplies needed, saving you money compared to purchasing specialty nail art tools and polishes.
Additionally, household items are readily accessible in your home, allowing you to experiment and get creative at any time. You don’t have to make a special trip to the store. The variety of textures and looks you can achieve with things like aluminum foil, bobby pins, tape and more is limitless. You can create different patterns, textures and designs using the same basic household items.
Doing nail art with household items also allows you to try new techniques and experiment without worrying about wasting expensive supplies, according to https://tillynailart.wordpress.com/2013/08/26/21-benefits-of-nailart/. Overall, home nail art with household items is budget-friendly, easy to access and full of creative possibilities.
Gather Your Supplies
Before you start creating fun nail art designs, you’ll want to gather some basic household items that can be used as makeshift nail art tools. Here are some of the easiest ones to use:
- Toothpicks – Great for dotting small designs and applying precise details (source)
- Straws – Cut into small rings or pieces to stamp circles and shapes (source)
- Tape – Use striping tape or masking tape to create clean lines and geometric shapes
- Foil – Apply with topcoat for a chrome effect, or cut into shapes
- Sponges – Dab on polish or gradients
- Bobby pins – Use the ends to make polka dots
- Stickers – Decorate nails with self-adhesive gems or shapes
- Glitter – Sprinkle over wet polish for sparkle
- Beads – Glue on for 3D embellishments
Look around your home for other potential tools like rubber bands, paper clips, and more. Get creative with ordinary household items to DIY cute nail art!
Toothpick Nail Art
Toothpicks can create some beautiful nail art designs. Their pointed tips allow you to draw fine details and intricate patterns. Some popular toothpick nail art ideas include:
Dot patterns – Covering nails with colorful dots and shapes is an easy beginner design. Use the pointed end of a toothpick to neatly place dots across the nail. Experiment with different sizes, colors, and dot patterns like polka dots or zig zags.
Geometric shapes – Draw straight lines and geometric patterns like triangles, squares, diamonds, and chevron designs. The rigidness of a toothpick makes it easy to create sharp edges and symmetrical shapes.
Flowers – For a romantic, floral look, use a toothpick to hand paint small blossoms. Outline the flower petals first, then fill them in. Add leaves and stems to complete the nature inspired nail art.
(Source: https://www.pinterest.com/tan_marine/toothpick-nail-art/)
Straw Nail Art
A fun and easy way to decorate your nails is by using a straw to create fun patterns and designs. Straws can be used to make polka dots, striped patterns, geometric shapes and more on your nails.
To create polka dots, dip the tip of a straw in nail polish and gently dab it onto your nail in a polka dot pattern. You can use different color polishes to make multicolored dots.
For striped nails, paint a base coat in the color of your choice. Then take a straw and cut it on an angle to create a wide opening. Dip the cut end of the straw into a contrasting color and gently press onto the nail to create stripes.
Using the straight edge of a straw, you can also create geometric shapes like triangles and diamonds. Simply dip the edge of the straw into polish and firmly press it against the nail to imprint the shape.
Straw nail art is an easy way to add creative flair to your nails using common household items. Get creative with polka dots, stripes and geometric shapes!
Source: https://www.pinterest.com/pin/nail-designs–482096335105038470/
Tape Nail Art
One of the easiest DIY nail art techniques is using striping tape. Striping tape comes in various widths and colors, and can be found at most craft and beauty supply stores. Using tape allows you to create fun patterns like stripes, chevrons, and graphic designs with minimal effort.
To create striped nails, simply apply a base coat on clean nails. Then take your striping tape and place it diagonally, vertically, or horizontally onto your nails, pressing it down firmly. Paint over the tape with your choice of nail polish color. Let it dry completely, then carefully peel off the tape to reveal a perfect stripe!
For chevron nails, apply tape to the nails in a zigzag pattern, pressing down on the edges. Paint over the tape with polish, let dry, and remove. The result is a cool chevron nail pattern. You can use tape to create countless other graphic prints too like polka dots, triangles, diamonds, and more.
Some tips when using striping tape for nail art: use a base coat so the polish doesn’t stain your nails. Apply tape smoothly and rub edges down so there are no bumps. Make sure polish is completely dry before removing tape. Go slowly removing tape so you don’t mess up design. Get creative with colors and patterns!
For more tape nail art inspiration, check out this Pinterest board.
Foil Nail Art
Foil nail art is a fun and simple way to add metallic accents to your manicure. Using nail foils allows you to create a variety of eye-catching effects like a full foiled nail or a holographic look.
To get started, you’ll need nail foil – this comes on sheets with different foil colors and designs. You can find nail foil at beauty supply stores or online. You’ll also need a foil adhesive – this helps the foil stick to your nail polish. Adhesive options include clear nail polish, a foil glue, or even mod podge.
For metallic accents, paint your nails with a base color then add dots of adhesive where you want the foil pieces to go. Use tweezers to gently place small foil pieces on the adhesive and press down firmly. Finish with a top coat to seal in the foil.
To foil a full nail, coat the nail completely with adhesive and lay a larger foil piece over the nail. Rub the foil down to make sure it adheres smoothly. Trim off any excess foil around the edges. Top coat to seal it in place.
Play around with layering foil pieces for a fun holographic effect. Mix different foil colors and patterns. With some creativity, foil nail art allows you to achieve any metallic design!
Foil nail art is an easy way to add a touch of glam to your nails using household items. The foil pieces you apply can transform your polish into a gorgeous metallic manicure.
Sponge Nail Art
Sponging is a fun and easy nail art technique that creates an ombre or gradient effect on your nails. It’s done by dabbing the nail with a makeup sponge loaded with different colored polishes. The result is a blended, multi-colored look that can incorporate as many colors as you want.
To create an ombre background, apply your base color first. Then use a cosmetic wedge or sponge and add droplets of a darker polish color a little higher up on the nail. Lightly dab and smooth the polish out just enough to blend the colors together. Continue using polishes in darker shades as you move up the nail to create a fade effect.
You can also make abstract textures by experimenting with different dabbing and smoothing techniques. Try twisting the sponge versus patting straight up and down. Use various sizes of sponges and alternate colors for bold or subtle patterns.
Sponging is great for gradient nails, smokey effects, marble textures, and any look where you want softer, blended color transitions. It’s an easy way to get salon-worthy results using household items. Get creative with colors and patterns to create artsy ombre designs on your nails. For more sponge nail inspiration, visit https://www.pinterest.com/breanamachado/sponge-nails/.
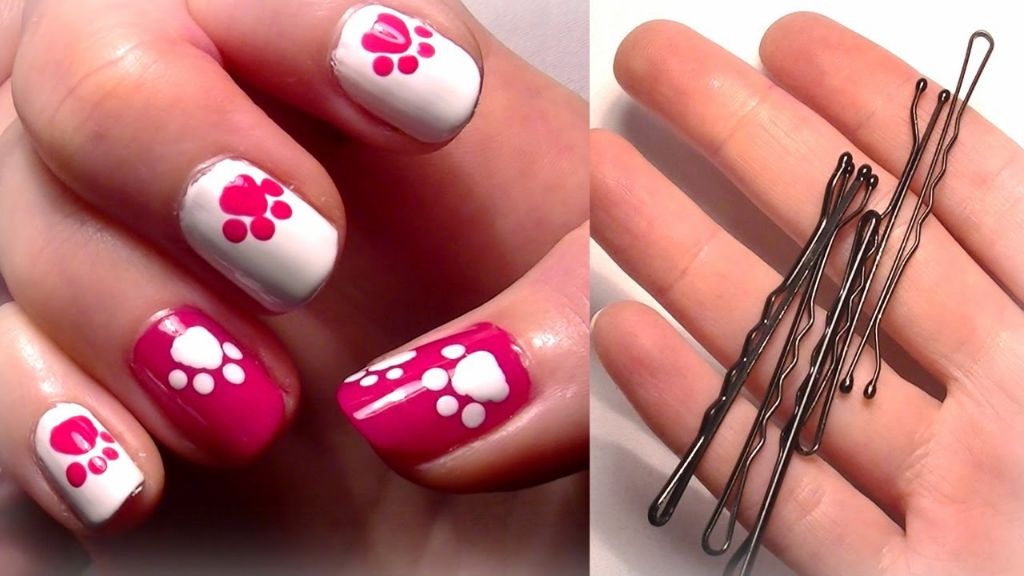
Bobby Pin Nail Art
Bobby pins can create cute designs on nails that only require a few supplies. Here are some ideas for bobby pin nail art focusing on flowers, bows, and animal shapes:
For flower designs, trace around the edges of a bobby pin with a base coat of nail polish to create a flower petal shape. Fill in the petals with different colors. Add a dot of glitter or rhinestone in the center for a sparkly effect.
Bows are another popular bobby pin nail design. Paint your nails a base color, then place a bobby pin vertically across the nail and paint on dotted lines across it to look like bow ties. Fill in the empty spaces with a contrasting color.
Cute animal nail art is easy to achieve with bobby pins too. Paint a base coat in a neutral color. While still wet, place a bobby pin on either side of the nail to create ears. Use a small brush dipped in black polish to add eyes, nose and whiskers. For bunny nails, add a cotton ball dabbed in white polish for a tail.
Bobby pins allow you to get creative with shapes and designs. They are inexpensive and reusable household items that create charming nail art. With a steady hand, you can make professional looking designs right at home.
Conclusion
Nail art using household items is a fun and creative way to stylize your nails from the comfort of your home. As we’ve covered, you can use simple tools like toothpicks, straws, tape, foil, sponges and bobby pins to create unique designs. The possibilities are endless when you use your imagination.
The techniques we outlined provide a solid starting point to get comfortable with DIY nail art. Don’t be afraid to experiment with different household items not mentioned here to invent your own distinctive looks. The key is to start simple, have fun and add your personal flair.
Nail art is a wonderful creative outlet and way to express yourself through beauty. Hopefully this beginner’s guide provided inspiration to try household item nail art yourself. Approach it with an open mind, let your creativity flow and you’ll be amazed at the stylish manicures you can achieve right at home.