Mastering Diy Nail Art With Striping Tape: Step-By-Step Guide
Striping tape has become a popular tool for creating fun and creative nail art designs. Though new to the nail art scene, striping tape actually has its roots in the auto industry. It was originally developed in the 1990s as a way to create pinstripes and detailing on cars.1 Nail artists later realized that striping tape could allow them to achieve intricate designs and patterns on nails that would be difficult to paint freehand.
In this comprehensive guide, you’ll learn everything you need to know to start embellishing your nails with striping tape. We’ll cover how to choose the right tape, prep your nails, cleanly apply and remove the tape, and troubleshoot any issues. You’ll also find a collection of beautiful striping tape nail art design ideas, from simple patterns to more advanced designs. By the end, you’ll have the skills to create salon-worthy striped and geometric nail art using this fun and easy tool.
Striping Tape Basics
Striping tape is made of thin vinyl with an adhesive backing that allows it to stick to nail polish. It comes in a variety of widths like 1mm, 2mm, 3mm, 5mm, and even thicker options like chevrons. There are different styles like straight lines, zig zags, dots, and more.
The main pros of using striping tape versus freehand are that it creates clean, straight lines and geometric shapes perfectly every time. It takes the guesswork out of nail art and is great for beginners. However, the cons are that it can be trickier to get smooth curves with tape versus freehand painting. There is also less flexibility and room for creativity compared to freehand designs.
According to Nail Lovely’s “Tape It Up!” video, striping tape is ideal for graphic liner looks and anyone wanting perfectly precise striped nail art.
Choosing Striping Tape
When selecting striping tape, you’ll first want to consider your nail size and the design you wish to create. Wider nails can handle thicker striping tape while smaller nails look best with thin, delicate tapes.
Make sure to match the width of the tape to the width of your nail bed. For example, 1/8 inch tape works well on pinky nails while 1/4 inch tape is better for thumbs. Tape that’s too wide will extend past the edges of your nail.
The color combinations and patterns you select will also impact your tape choices. If creating an accent nail, a single colorful tape can make that nail pop. For full nail designs, coordinate 2-3 tapes in alternating patterns. Contrasting colors tend to stand out best.
Browse the selection at beauty supply stores to view available widths, colors and designs. This will give you ideas for the patterns you can create. Refer to online tutorials for additional inspiration.
According to https://clutchnails.com/blogs/news/nail-tape, thinner specialty tapes allow for more intricate striping patterns. Consider your skill level when deciding on tape styles.
Prepping Nails
Properly prepping the nails is one of the most important steps when working with striping tape. According to GelishGeekery.blogspot.com, you’ll want to start with filing and shaping the nails into your desired shape, making sure the edges are smooth.[1] The nails should be filed evenly across the surface as well. This helps the tape adhere better and creates a smooth canvas for your design.
Next, take care of the cuticles. Gently push back and trim any overgrown cuticles so they don’t interfere with the tape application. You’ll also want to remove any surface oils or debris by cleaning the nails with acetone or alcohol.
Apply a base coat to help the design adhere and prevent staining of the natural nails. Using a quick dry base formulated for nail art is recommended, as you don’t want the base to be tacky when applying the tape. Finish with a top coat after the design is complete to seal and protect your nail art.
Applying Tape
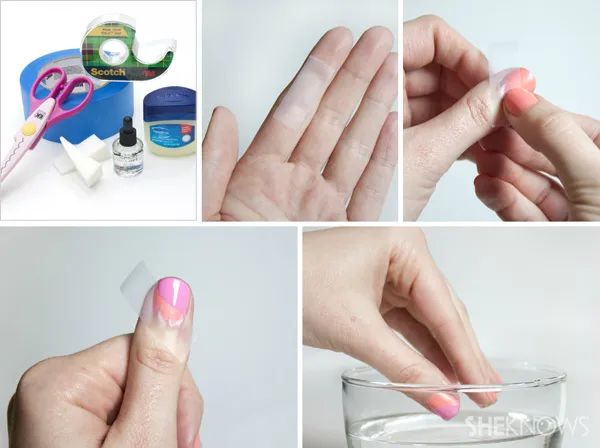
The key to cleanly applying striping tape is removing the tackiness before sticking it to your nails. According to the helpful tutorial on Pinterest (https://www.pinterest.com/pin/472948398352656140/), you’ll want to stick the tape to your skin first to reduce how sticky it is. This prevents the tape from sticking in the wrong places or peeling up when you go to paint over it.
Once the tape is ready, carefully smooth it onto your nail, starting from the cuticle area and working outward. Make sure to wrap the tips of the tape around the free edge of your nail for a seamless look. Go slowly and gently when applying to get straight, clean lines. YouTube creator BeautybyKaren (https://m.youtube.com/watch?v=w6BIZ3BTgDQ) recommends using tweezers or a toothpick if you need extra precision.
You can play around with different angles and curvature when applying tape. Try straight lines across the nail, curved designs, or diagonal stripes. The angle and shape you apply the tape will depend on the overall look you’re going for. Take your time applying until you get crisp, sharp lines.
Painting Over Tape
Once you have applied the striping tape design to your nails, the next step is to paint over the tape. It is important to use thin coats of polish when painting over striping tape. Applying polish too thickly can lead to bleeding under the tape or cause the tape to lift at the edges. According to www.vintage-mustang.com, “Do NOT use paper tape for stripes, it leaves a huge paint edge and you take the risk of it leaking under the tape.” Using multiple thin coats allows each layer to dry properly before adding the next.
When painting over striping tape, it’s fun to alternate polish colors to create a rainbow or ombre look. Apply a coat of one color, let it dry, then follow with a different color and so on. Alternating colors helps the stripes and patterns stand out. Just be sure to let each layer dry thoroughly first. The folks at www.derbytalk.com recommend, “Painted the body first, full sanding/dry, etc. Mask off the stripes, paint, wait about 10 mins as Sporty says – then remove tape at an angle.”
No nail design is complete without a good top coat for shine and protection. Apply a fast-drying top coat over striping tape nail art to help seal in the design. The top coat also helps prevent chipping and peeling. Let the top coat dry fully before attempting to remove tape.
Removing Tape
One of the keys to perfect striping tape nail art is taking your time removing the tape. You’ll want to let your nail polish dry completely before attempting to peel off the tape. This prevents smudging or pulling up sections of polish. A good rule of thumb is to wait at least 20-30 minutes after your last coat of polish before removing tape.
When you’re ready, slowly and gently peel the tape off the nail, holding down the area near the cuticle with your other hand. Pull the tape back on itself, rather than straight up. Go slowly and watch for any polish that may catch on the tape. If you do notice polish sticking, stop and re-press the tape back down before continuing to peel.
After removing all the tape, examine the edges of the striping lines. Use a small brush dipped in acetone to gently clean up any smudges or uneven edges. Be very delicate as you tidy up the nail art with the brush. Quick touches and a steady hand will keep your striped design looking perfect.
Troubleshooting Issues
When using striping tape, you may encounter some common problems. Here are some tips for troubleshooting the main issues:
Wavy Tape Lines
If your striped lines look wavy, it’s likely because the tape did not adhere properly to the nail. Make sure to firmly press down on the tape after application to maximize adhesion. Using a top coat underneath the tape can also help it stick better.
Additionally, apply the tape in straight lines and use a tool like tweezers to smooth it and prevent warping. Take care when painting over the tape not to pull it up and bend the lines.
Polish Bleeding Under Tape
To prevent polish from bleeding under the tape edges, make sure you apply a top coat over the base color before adding the striping tape. This seals the polish and creates a smooth surface for the tape to adhere to.
You can also try painting just inside the tape lines instead of directly over them. This leaves a tiny gap that minimizes bleeding potential. Be very precise when removing the tape so you don’t smear any leaked polish.
Using striping tape specifically designed for nail art can also help, as it has adhesive made to block polish from seeping underneath.
Tape Not Sticking
If the striping tape does not want to stick to the nail, first make sure the nail surface is clean and free of oil, lotion, etc. Roughing up the nail plate slightly with a file can help the tape grip better.
Apply a layer of top coat and let it dry completely before adding the tape. The smooth, dry surface allows for optimal tape adhesion. If you’re working on gel polish, cure it fully before tape application.
Press each piece of tape down firmly when applying it. Go slowly and use a tool like tweezers or an orange stick to get the tape as close to the nail as possible, eliminating gaps where it could lift up.
(Source)
Striping Tape Design Ideas
Striping tape opens up lots of possibilities for fun nail art designs. Here are some of the most popular striping tape looks to try:
Cheetah Print
Create a cheetah or leopard print design by layering tape in different directions across the nail. Use black and yellow striping tape to capture the animal print effect. Follow a tutorial like this one for step-by-step instructions: Striping tape nail design with regular polish.
Geometric Patterns
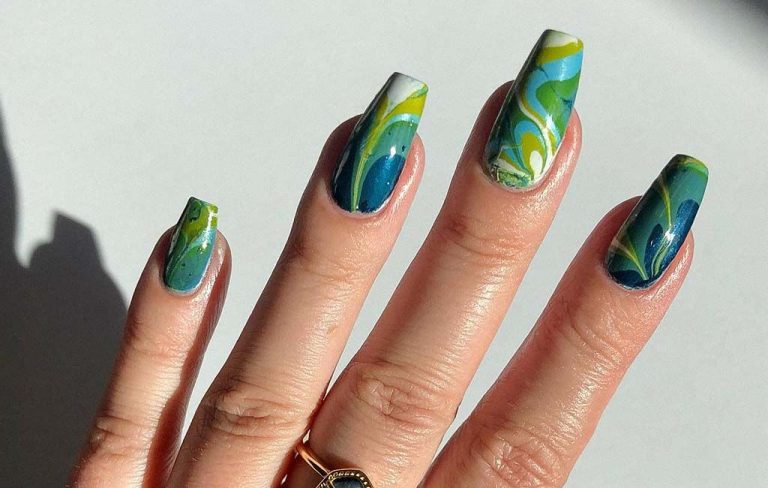
Striping tape lends itself perfectly to graphic, geometric nail art. Create triangles, lines, shapes and patterns using different colors and widths of tape. For inspiration, check out the geometric striping tape designs from Poised & Polished.
French Tip Stripes
Jazz up a basic French manicure by adding striping tape. Apply tape across the tips to create color blocks and stripes. Use tape thinner than the white French tip to create a layered look. This is an easy way to put a unique spin on the classic French style.
Negative Space
Try using striping tape to section off parts of the nail, creating a cool negative space effect. Layer tape vertically, horizontally and diagonally across the nail. Paint the exposed sections in different colors to make them pop. Remove the tape carefully to keep the blocks and shapes crisp.
Caring For Striping Tape Nails
After putting in all that effort creating your striping tape nail art design, you’ll want it to last as long as possible without chipping or smudging. Here are some tips for caring for your manicure:
Avoid chips and smudges by applying a quality top coat like Seche Vite over your nail art. This will help seal and protect the design.(1) You can also apply gel top coat or acrylic over the nail art to make it more durable.
Use nail oil like cuticle oil daily to keep nails and cuticles hydrated. This prevents nails from becoming brittle and prone to breaks.(1)
Be gentle with your hands and avoid picking at your nails to make the manicure last longer. Consider wearing gloves when doing household chores.
When it’s time for removal, avoid pulling off the tape. Instead, use acetone or nail polish remover to gently dissolve the tape adhesive. Gently roll the tape off the nail to avoid damaging your nails.(1)
With proper care and maintenance, your stylish striping tape nail art can last for up to 2 weeks without chipping or peeling!